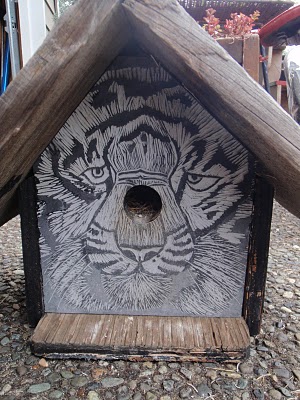
Bite Me

i found this plate at the thrift a few weeks ago.  i have been looking for pretty plates to write silly messages on like i have seen on Etsy.  this one has pears and cherries so i figured, "Bite Me" was appropriate!

here is the plate without the words

the back already had a hanger on it

i do not own a porcelaine pen yet so this time i used adhesive letter stickers and then varnished with clear matte shellac to finish it off and make it last and be durable for longevity.

i have a few other blurbs i want to try out on plates and dishes but i will wait until i have the porcelaine pen since you can paint or draw whatever you want, bake it in the oven for a few, and then have a new creation made.  lots of exciting possibilities with this!

the "bite me" plate is down at the shop for sale.

skiing the Cascades,
xoxoxo
jennette

Another Basket Liner

made another basket liner to sell at the shop.

here is the plain basket, long and rectangular.

here is the basket laid out on the piece of floral linen i used to make the liner.  now that i look at it, i like this "wrong side" fadedness much more than the "right side" brightness. 
i did actually try to bleach out the fabric a bit first but it didn't react to the bleaching.
not. at. all.

here is the fabric laid out and ready to be sewn up to make the corners.

here is the liner draped over the basket before i made the casing for the drawstring ribbon.

and here's a final look at the lined basket.

i'm in a "lining" mood but now need to shift to a "recovering" mood.
Kathy has hired me to do more sewing for her again.  this time it's to recover a lounge cushion in old vintage corn feed sacks.  i will show you the whole project as soon as i am finished.  Kathy and i agreed to do half trade, half cash for this job. 
and i absolutely cannot wait to show you what i am getting in trade!  it is to die for!  at least to me.  y'all know how much i like weird stuff.  well this is gonna be right up the "so weird it's the coolest thing ever" alley.  just wait!

cooking lobster ravioli with a shallot, lemon, olive oil, cream and parsley sauce for jasper and my dinner.  can i get a "hell yes!"?  i thought so! :)
xoxox
jennette


Basket Liners

I made some basket liners for my friend Kathy last weekend.  She had this rolling market cart that folds flat and she had a large circular rolling basket that she wanted to use for laundry.  Unfortunately I forgot to take final photos so I only have a few of work in progress.

Here you can see the print on the fabric and the awesome green color on the wheel and spokes.  Kathy and I found a queen or king size Ralph Lauren sheet at Goodwill and that's what I used for one side on these liners.  The other side in unbleached muslin.
The liners are super easy to make.  You just measure all four sides of your basket and then add in an inch or so for a seam allowance.  You lay it out like a huge rectangle.  Then with right sides together you sew it like your making a pillow case and leaving an opening to turn it right sides out.  You do the same for the bottom piece and then you attach the sides to the bottom.  You can see above how I try to make the seam run down the center back.
I use sets of ties at the top to hold the liner secure to the top bar of the basket.  On this one I top stitched the ties to the sides of the fabric.  You can either have them pinned in and sewn in the seam or you can top stitch them on after you've turned it right side out.  Either way its cute and it works!

This is the large circular basket that Kathy will use for laundry.  She had originally just wanted it all muslin but I forgot and made one side with the RL sheet.  Here is where you won't see a photo of it complete but you get the idea.  You can see the bottom piece here.  Once I had the super long rectangle of fabric for the side complete I simply pinned it to the bottom circle and sewed it all together.  On this one I did pin in the sets of ties to the seam, sandwiched between the right sides, so when it was turned right side out, the ties were dangling from the top, every 6 inches or so, all the way around.  Easy pie!
Here is a view of the circular basket from the top.  What's nice is that these liners are reversible.  You can have either side showing, inside or outside.  They are also completely washable, durable and preshrunk so you can get a lot of use out of them.

I have several more market baskets I will be making liners for and selling at M&M.  I made a liner for one last spring and it sold the day I brought it in.  A lot of us use the market baskets at antique shows and flea markets to carry all our loot in and help keep our hands free for browsing.  They would also be handy at a park, the zoo, the beach, and at concerts or festivals.

I will let y'all know when I have some for sale.  I am not listing them in my Etsy shop since the pacakaging and shipping is not something I can take on at this time. I really do have at least 10 more market baskets in the basement so do let me know if you want one.  I will take custom orders.  Thanks!

xox
Jennette 

PDX Loot

Found this little "Totoro" at Flora.

Blow up paper balls from Cargo.

Sweet little Hmong baby shoes and raspberry velvet box from Monticello.

Mushrooms and glass glitter bird from Cargo.  Little Doll, Demitasse box and candle holders from Monticello.

This little glass eyed green velvet pixie is my most favorite item from Monticello.

Velvet hangers,
white leather gloves,
and my next favorite thing from Monticello, a canvas newspaper bag for The Journal, Portland, Oregon.  I will deconstruct this and remake it into a bag for myself.
I have a project in the works with a bunch of white leather gloves so i will show you when its underway and happenin'.


Velour vest purchased at Magpie Vintage in Portland.  I also got an awesome blue, what I like to call "70's airline blue," leather mini skirt that will get made into a bag.  I will show it to you when it's being transformed.
These are some of the items I bought in Portland but not at Little Winter.  I keep forgetting to take a photo of the crystal necklace I got from Mossiere.  I did not spend nearly as much time shopping on this trip to pdx as I normally do so I don't have as much to show.  Although all combined, I probably did come close to my normal haul with all the loot from the handmade market as well.  I didn't really buy anything to resell this time, which is OK, since I still have plenty of stuff in the garage and basement to sell. 
I did go to the Monroe Antique Show and Sale at the fairgrounds over this past weekend so I will have photos of loot to show you from there.  I scored on an amazing quilt that I will hang on the wall over my bed.  And Jane sold me 4 vintage clothing pieces that are to die for and were so inexpensive!  And I almost didn't go!  You just never know what little treasures you'll find.

Happy Monday everyone,
xoxox
Jennette

Witch of the Woods

Found this awesome and strange painting down at M & M a couple weeks ago.  It's like it was meant for me.  I asked how come nobody told me it was there when I discovered it and they said something to the effect of, "Oh, its been around here for a while now.  We didn't know you would love it and we kinda forgot about it anyhow."  Just goes to show ya that you never know what you'll find when you are on the hunt for treasure!

Here is a close-up of the girl being blown away.  I love the dark feeling of this painting.  It seems so Autumnal and appropriate right now.  She is holding a stick or broom in her hand.  The sky looks dark and ominous.  It looks to be signed on the front bottom right corner:
J P Walsh.....

What!!?  So I'm looking over the back of the painting.  I'm admiring the use of old wood to make the frame the canvas is stretched over.  The wood appears to be from an old crate or sign because there are painted letters that look like advertising on some of it.  Looking closer I find old hand writing and the words: Witch of the Woods!  Total Score, People!  I have no idea who this artist is or even how old this is but I LOVE IT!

I am working up to painting a few walls in my house in the coming weeks.  I know exactly what I want to do but haven't had time yet to execute it.  But once it's done I will be rehanging a lot of the art in my house.  I hope to show you before and after pictures.   

I'm off to practice my Nacho Libre monologue for Miscast!  Don't miss out on the fun!  Monday October 25, Conor Byrne Pub in Ballard, 7:30, $10, all proceeds to benefit New Amerikan Theatre's production of Stings Like Acid.
Be there or be square!

xoxox
Jennette


Glam Witchy Haunted House!

The Glam Witch, in all her glory!

I had an old dollhouse down at the antique mall that had been there for months.  When I did this big reset of my space last week I decided I was done with it there and I was going to turn it into a haunted house.

Here is a photo of the house as I started to tape off the roof.  I liked the dark gray slate color the roof was so I wanted to preserve it.  Everything else I wanted black!

See.  The lite green and red simply wouldn't do for a haunted house!

I am giving you a view from every angle so you can understand how much this needed to become a haunted house!

First coat of spray paint.

Ah ha!  Haunted house base ready for embellishment!

So I found this little doll down at the antique mall and she was $5.  Her eyes are kinda wild and her hair jet black so I just thought she'd make a great little witch.  I remembered that I had that little cupcake topper jack-o-lantern bucket to hang off her arm and I found a tiny key to hang off the other arm.  She ended up with a hand charm necklace as well.  Lucky girl!
I made her the black hat out of construction paper.  I added glitter trim, a silver star and feathers coming out the top.  She is looking real witchy with her hat on! 
Once I had the silver glitter out, it was all over!  In the sense that I wanted to glitter-fy everything!  So I added glitter trim to the house to give it some bling.

I added cheesecloth behind the windows and then glued in long black feathers.  I added really small details that are hard to capture but I will try to show you.  I had some agate beads that are black birds so I glued them above some of the windows.  There is a bat hanging out in the eves, some spiders on the roof, a skull in a heart and limbs hanging in the windows!


The arm and leg charms are little Milagros from Mexico.  They come in handy as spooky elements.

There just happens to be a lamp on behind the house so it gives the windows a nice glow.


"Why you call me Crazy Eyes?!"

Here is a view of the back.  You can see how it all got painted black, wallpaper and all.  If I don't sell this house soon I am going to be tempted to furnish all the rooms!  Yes, I do have miniature vintage doll furniture.  You know I do!

Watch out!  She'll try to get ya!  She has a bucket full of glitter and she isn't afraid to use it!

So that's the haunted house I have been working on.  Upcycled, recycled, and repurposed.  Good as new!  I put a high price on the whole sh-bang for now because I wish I had the room to keep it and don't want to see it leave so fast but I will likely mark it down by next week if its still there.
Not a lot of sewing in the past few days.  Worked on some baby gift items and have a lot of sewing projects planned but it all comes down to the amount of time I have to sew in one day, people.  There just aren't enough hours!
Off to do some pasting,
xox
Jennette


Antique Mall Space

Vintage Map Wallpaper

Last week I spent some time down at M&M Antique Mall, redoing my space.  Most of the wall was peg board and I couldn't stand what it looked liked.  I had a box of vintage maps from my Grandpa's stash and there were plenty enough to cover the walls.  The maps make a nice backdrop for all the various treasures I have for sale in my space, #23.  I forgot to take a photo with everything away from the wall but you get the idea.

Here is part of my Halloween display.  I have costumes for sale too.

I highly recommend Boarder Paste for a project like gluing old maps to walls.  It rolls on the back of the maps and then you smooth the maps against the wall and you have wallpaper!  Its pretty fantastic, quick and easy, especially when you are using paper as big as maps.  They cover up the wall fast and the border paste makes it simple to do.


All of this is for sale now!  Anything you see in these photos is fair game!  Come and get it!

I am bringing in new items almost daily.  They don't like it when I drop stuff off that isn't priced so I just bring a little at a time as I go through the massive piles in my garage.  I should have taken a picture of the stacks in the garage to show you.  As I purchased items over the summer they mostly just got piled up in the garage until I could deal with them.  I knew I was going to be doing a major reset of my space at M&M so I was reluctant to take all the garage stuff in before I had the walls redone.  Now it's game on and I almost have a clean garage!

My awesome friend Kathy helped me rearrange all the furniture in my space and she helped with merchandising all my items.  Kathy has an amazing knack for decoration and display.  I will do a feature soon of her space at the Antique Mall and make sure you check out our windows next time you stop by.  The windows are Kathy's handiwork!

See the large blue plate rack hanging on the wall?  You should have seen Kathy and I trying to get this thing lifted up while attaching it to the wall.  Comedic!  But it's done and I love it up on the wall rather than sitting on the floor.  It came from Left Bank Antiques up in Anacortes, Washington.  I love that place and I love this Portuguese plate rack but I have no room for it at home now.  Its the perfect blue!

This little blue cabinet is one I got from Kirsten many years ago.  It used to be in the kitchen of their first house.  Then I had it for a while before I ran out of room for it too. 

So space number 23 is looking pretty fabulous!  Thank you local friends who have stopped by to see what's new recently!  Mighty kind of y'all!  And I appreciate the warm feedback and comments y'all give.  Very sweet! 
I'm off for a run and to work on a top secret project for a friend's Mother Blessing!
xox
Jennette


When I Shop

When I go shopping for, well, everything, the back of my car ends up looking like this.

And the seat next to Jasper looks like this.

When I sort through all that stuff I bought at tag sales, thrift stores, flea markets, estate sales, auctions, etc., and after I get most of it priced, the back of my car looks like this when I am getting ready to take it to the antique mall where I have my space.  Bye bye goodies, hello paycheck!

Jasper is such a sport about being crowded in with all my good junk. 

This is one view of what my space at the mall looks like.  Stuffed full of vintage treasures!

Come take a peek if you are in need of some bad-ass, uber cool, stylin', good junk!  All our vendors have unique and interesting items and our inventory changes daily.  My hope is that by late fall I will also have an Etsy sight up and running so I can have another outlet for my smaller items and the few things I make.  I will keep you posted but until then, come visit M&M Antiques and Collectibles at 119 W Main St., Monroe, WA.  98272. 360.794.7660

Gotta go unpack from our whirlwind last two weeks of visiting Westport, Chelan and Lopez Island,
Whew!  Wish me luck!
Jennette


Woodblock Stamps

So I have told you all now that you should be using Google Reader to gather your information, remember?  And since I follow my own advice, and I use Google Reader, I get to be bombarded with all the great goodness in blogland every. single. day.   And I love it!  I get new info and new blog posts at my fingertips without having to go check every single blog I love.  So easy.  So do it!

A few days ago in my Google Reader inbox was a post over at Design*Sponge about woodblock stamps.  I have woodblock stamps!  And I forgot all about them until I saw that post.  So I tracked mine down and took some sunny photos.

Even though these are meant to be used on fabric, with paint or dye, these remind me of the Henna designs I love to have created on me by Julie.  She is rather talented at Mehndi and when we are together I always want her to give me a henna blessing.


I bought all of these, years and years ago, before children, so over 16 years ago, from antique dealers.  Back in the day large shopping malls like Alderwood and Northgate would host antique shows.  So all the vendors would be set up in the middle of the mall and I would go to the mall just to shop these sales.  I have not been a "mall person" since junior high but boy howdy would I high tail it to the shopping mall when they were filled with antiques!

This is a large one compared to the first two.  I like the flower design.  But what I really love, and have always loved, as long as I can remember, is Paisley!

I lurve me some paisley!  Maybe it was when I was a teenager and my Auntie started collecting wool paisley shawls, that I began falling in love.  Since fine wool paisley shawls and spreads are FAR out of my reach financially, I will settle for some nice wood paisley for now.

I have used a few of these, again, years and years ago, to make some block stamped silk scarves.  I used the paisleys and fabric dye and fabric paint and long white silk scarves.  I liked how they turned out then.  Not perfect and a little primitive looking.  Love the not perfect and primitive.

Last but not least, another big block stamp.  Now that I have these all out I think I will come up with a summer project for the kids and I to do.  Maybe we can block stamp a beach blanket.  I'll report back later and let you know how that all works out. 

Stamp, sew and create!

Off to pick tomatoes,
Jennette

Come one,Come All!

These are all items I took down to the antique mall last night!  If they call to you, go get em!  My space is #23 across from the front counter.  Enjoy!  And thanks for looking!

red plant stand, indoors or out

doll friends wooden toy
vintage kite string holders
rusty old fan.  not working.  parts? Industrial/found art project?  steampunk art? hmmm...

LOVE these!  But they don't fit me.  boo hoo.  Here is J. modeling them.  They do fit him perfectly so they are about a kids size 1-2.  I wanna move to Holland ;)
Mortar and pestle
buck bowl
bah, ram, ewe. bah, ram, ewe.  Cheese tray and wooden critter shakers. 
amazing old vintage tapestry
lovely old toll painted hanging mirror with little wall pocket and rack.  we used it it to hold keys and scarves by our garage door entrance.  Now it can be yours :)
heavy black cast iron book holder.  maybe for recipe books in the kitchen, no?

and last, but not least, oh no, two whatchamacallit molds!  You know me, easily awed and distracted by silver and shiny things!  Do what ya will with them.....

Going to read myself to sleep, Jennette

Buying Trip Treasure

Small child size vintage suitcase

vintage half embroidered pillow case

close up.  love the faded colors and unfinished-ness of it.
I will leave it as is but make it into a pillow.

soft hand knit baby booties

The Drake Casket Company.  A new brush for my brush collection. Strange.  But true.

vintage table runner.  embroidered at both ends with same scene.  perfectly faded blue bird and cherries.  Will become a bag and a pillow.

big blue vintage first aid kit box

small orange vintage first aid box

the new Royal blue vintage typewriter

the Remington vintage blue typewriter

vintage blue and green tool boxes

Some, most or all of this loot will eventually end up at M and M.  Come check it out or email me if you see anything that strikes your fancy.  More photos to come, stay tuned!

What do you collect?  What do you buy? 

Be awesome!

For the Birds

Tiger Birdhouse

I found this wonderful tiger birdhouse over in 
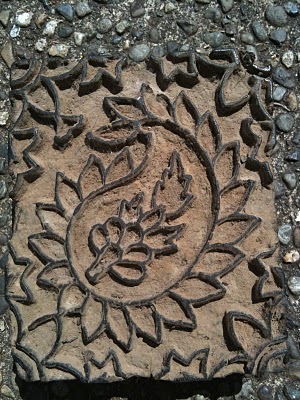
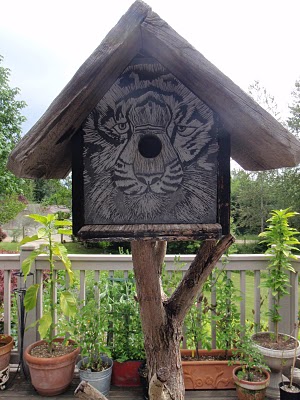
Eastern Washington this past weekend.  I thought the use of the old lino cut tiger to make the front piece was pure genius!  And it gives it so much character! 
The tiger was created by carving into a large linoleum block.  To get the print you then roll on ink with a brayer. Then you press it to paper to get the image printed.  Love it when people can figure out how to do lino block printing because I have such a hard time thinking in reverse about where you do and don't want color in your print.  My friend Julie does something like this and she is becoming brilliant at it. 


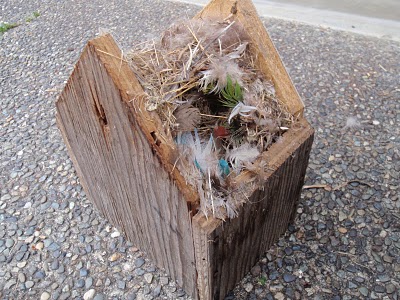
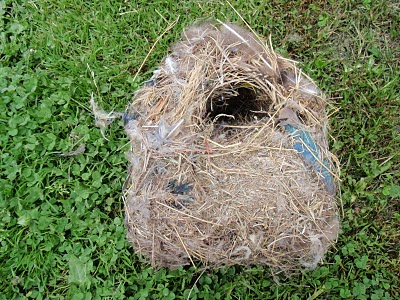
So there was a nest in it!  And the top had two screws holding it on so I knew I could get it out.  Also, I had an idea for the birdhouse the moment I saw it so I will show you what I did with it below.  First the nest:

A birdhouse shaped nest.  It had a lot of colorful feathers in it and twine too.  Who built it?

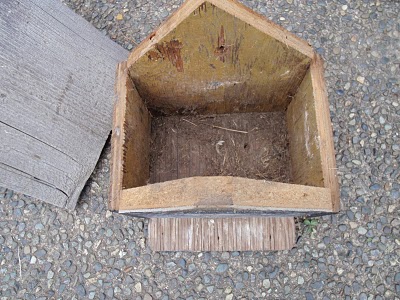
Here is the nest out of the house, shaped just like the house!  It was very delicate.

Empty birdhouse.  Ready for roof to go back on.  But not before the next step.

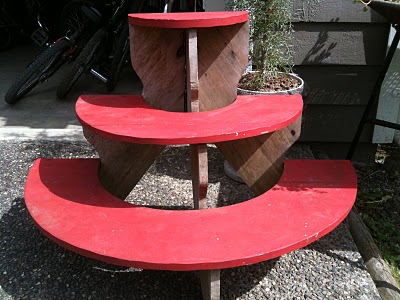
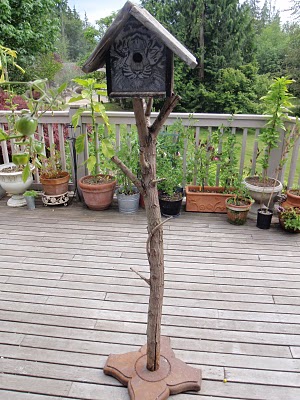
Now here is where the project comes in because it involves me using the power tools!  I have had this old wood, stand, tree, perch thingy, forever.  It's lived on the side of our house waiting for something to be done with/to it for years.  I was told it was originally a perch for big birds.  Some of the limbs must have been longer originally.  Oh, I am just remembering, this came from my dad.  One of his many cool finds that he passes along to me, knowing I will eventually come up with some crafty use for it!  Anyways, you can see it here:

Notice the super cool and very heavy base.  Its all rusted now, which I like.

Back view of house on tree stand

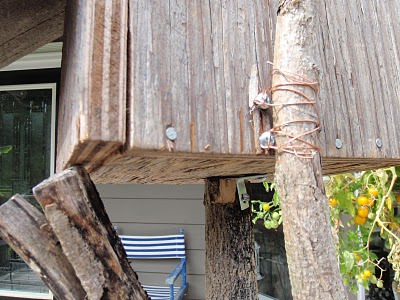
Before I put the roof back on I attached the house to the top of the "tree stand."  First I had to get my saw and cut a limb in the front lower and more even so the house could sit on it.  I added an "L bracket" behind that front limb to help keep the house steady.  Then I screwed in little screws in the back so I could "lace" wire over, under, and around them to hold the house tight to a back limb.  I made sure I balanced the house in three places so you can see it resting on a third limb, on the left in this photo.  It seems really solid so I am happy with it!

close up of tiger birdhouse attached to top of tree stand, with roof  :)


Full view.

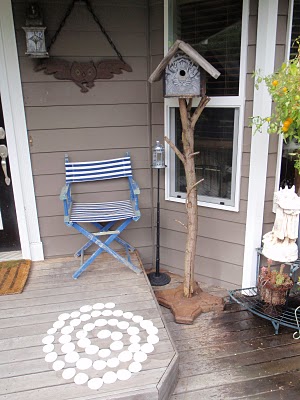
This is where the birdhouse tree stand lives for now.  Near my front door.  I doubt a bird will be brave enough to nest this low and close to the house but we use our front door so rarely, they might!  You can see our sand dollar spiral from the sand dollars amassed at Westport.  And you can see my metal work owl in this photo too.  More coming on the owl collection, in near future.

What projects have you been doing lately?  What is being created?  Do share!

Make, Do, Create.  Get inspired, be inspiring, and live life to the fullest!

I've gone to Typewriter Heaven


Four typewriters, right now.  4!

Gotta love a good "old-fashioned" typewriter!  We always make sure to have one around the house, in full use, most of the time.  We make our "special" lists on it.  Like our "What was so fine about 2009" list.  I needed that one to remind myself that last year was good.  And what better way to make a list than on an ol' typewriter.  The kids LOVE them.  We often have a story line going, that every one adds to, and they end up so hilarious.  I put those ones away in the scrap book.  And having a typewriter always available gives Jasper something "important" to do when I am at the computer and he needs a task. 

We had two typewriters already and then I scored 2 more this weekend on my so-called buying trip.  For me its hard to believe that there are people out there who have no clue of the value of a vintage typewriter!  I cant believe how crazy cheap they are when you find them at rummage sales and yard sales. Lucky me folks, lucky me!  So I will be bringing two down to M and M to sell and I will keep my two favorites around here so we can use them and have a back up :)

This is the Royal Signet.  This one will be for sale.  We had it around here all winter but I just found this other Royal that we will keep for a while:

This is the Royal Century.  I think its a little newer but I LOVE the blue color of it.  It's a keeper!

This blue one is a Remington.  It was made in Holland and its case was made in West Germany.  It will also be for sale at the shop.  Both of the typewriters I am taking to M and M are in great working order.  Did you know you can still buy new ink tape for these at the office supply store.  Who woulda thunk it?!

This is the other one we will keep around for a while.  Its an Olympia.  Probably the most vintage of this group.  Big, heavy, beefy.  It still has a dust cloth and dust brushes in a little case and the operating instructions.  Gotta love the completeness :) 

I find that now days people are buying these to take the keys off to use in jewelry making.  It amazes me that someone will spend $40-50 on one just to get the keys.  Also, last year my friend bought one just to use as a sedum planter!  I know!  Sounds like something I would do!  I guess if I took all the keys off and had one in really bad, unusable shape, I would plant the top and key area with sedums.  It would be darn cute!  I actually have a picture from a magazine of some such beauty.  If I can find it, I will scan it, so you can see.  And if I do that, then I will also take a photo of my ANCIENT Royal typewriter I have from my Grandma, that was her folks, so you can see how magical it is!  Its so vintage it has beveled glass panels on the sides and back of it!  Its total awesomesauce!  I gotta dig it out so you can see :)

Type on a vintage typewriter, be old school, feel cool and be awesome!  Word!