Vincent Schoolhouse

Vincent School House, Carnation vicinity, ca. 1915

Vincent Schoolhouse (1905) is located at 8010 West Snoqualmie Valley Road NE,Carnation.

http://www.historylink.org/ says this about it: The small farming community of Vincent is located on the western side of the Snoqualmie Valley south of Carnation.  In 1905, residents built a schoolhouse so their children could attend school close to their homes.  The school housed all grade levels and included students from many pioneer families in the Snoqualmie Valley.  About 20 students at a time attended the school.  Teachers were typically hired for two or three month terms in the fall and spring, seasons when parents could release the children from their farming duties to attend school, and milder weather eased travel for the students from outlying farms.  The school closed in 1942, but the Vincent Community Club still uses the building for social and community events.


side elevation, Vincent Schoolhouse

So I am kinda obsessed with this building.  I love it.  I have always loved old schoolhouses, community centers, churches, and barns.  I have also always wanted to live in one! 
I know.  Impractical and strange.  But oh, the ideas I have!  Before we bought our current house I dragged the family to look at an old church that was for sale in Snohomish.  It sat high on a hill and was SO GORGEOUS!  Alas, it was not livable nor in our price range so that tiny little dream was put on the shelf.  Also, when Gus was an infant, I saw an ad in the Little Nickel for a barn that was for sale.  It needed to be disassembled and taken away.  I dragged our young family there too, just to have a looksee, and it was so awesome.  It was a big old classic barn in Bothell and there was no way in hell we would ever have been able to number each board and beam, disassemble and reassemble that barn.  We had to experience, no expertise and nowhere to move it to.  But oh how I longed for that old barn.  I still dream of one day restoring and living in a historic building of some sort.  An old Odd Fellows Hall or Rebekah Lodge would be ideal!  There is an old schoolhouse in Port Angeles I have my eye on.  Its way up in the hills and overlooking the Strait. 
If anyone ever sees the sweet little Vincent schoolhouse go up for sale, I best be the first person you call to tell the good news!  Love me some old stuff, I do, I do!


Current photo of my schoolhouse :)  Look at that cute little porch.

Can't you see me living here with all my smashing rubbish! 

I want to go peek in the windows. So. Bad.

Bye bye sweet schoolhouse.  I love you.


Firsts

A First.
Last night Chad was sitting at the computer and he asked me a question about my blog.  Unusual, I thought.  He has never asked much and lets me alone to do my thing here in blog land, undisturbed.  I said something like - it's kinda strange that I have this whole other blog life and you have no clue, whatsoever, what I even talk about or show to the world.  On I went, making dinner, roasted whole lemon chicken, caesar salad, steamed broccoli and sliced oranges.  Eventually I look back over and see tears in his eyes.  He just looks at me and says - pretty awesome this blog.  And I can see he has been reading it all.  And I can see he is proud of me.  This not a first, by far, but the reading of the blog, a first.  For sure.
Another First.
Celebrating our 16 year anniversary this coming weekend.  Amazed.  Both of us.  How did time go that fast and where has the time gone?  Now closer to twenty years.  Wow.  Hard work for us but oh so worth it.  Love, love love my life and family!
One more First.
I have a 10th grader and a 2nd grader now.  Summer break has begun.  Will I survive this summer with them?  I suppose.  One is going to circus camp for the first time and one is going to bird banding camp for the first time.  If they don't hurt each other first.  If we all survive the over exposure of each to the other, first.  Love my boys but sometimes wish I could will them to stop acting like brothers to one another.  Treat each other like you would your grandparents.  You don't scream at, slap, spit on or hit your grandma.  And you don't antagonize, pick on, or poke at your grandpa.  (Well, a little bit, you do, but you know what I mean!)Leave each other alone,  To begin with,  The first time.

Live, Laugh, Learn.  Be a super star.  You are awesomesauce. 

Sedum Table

Ta da!

The sedum-succulent table top is DONE!

The table.  Exactly how I found it.  Do you think it had glass in the middle before?  Hmmmmm......

A different view.

View with chicken wire attached.  Yes, that is chicken wire attached with green twisty ties since I couldn't find the clear plastic zip ties.  Yes, I am resourceful :)  And determined!
Photo with center dowel brace installed.  Find an old dowel that used to be a chicken roost.  Cut the ends at similar angels.  And shove it up and under your first layer of "mesh."  Voila!  Center brace!
Table with second layer of "mesh."  I used "Gutter Gaurd" for this layer since I wanted a smaller weave than the chicken wire.  Both, together, give this structure, heft, and just the right size for water to drip thru but not spanish moss or soil to seep thru.  perfectomundo!

Topped with Spanish moss.
Close up of one corner.  I was trying to show how you can still kinda see the wire mesh mess underneath even though it has a nice thin layer of moss on top.  Key with the moss is to use "just enough," and not too much.  Especially if you are buying it from the hardware store.  Be frugal!
Which layer is this?  Oh yeah!  Like the 4th layer, or so.  Soil on top of Spanish moss, I guess :)
Another view of the finished table just after planting and first watering with organic fish food fertilizer.

View with another newly planted sedum chair, as well. 

Plant, grow, nurture.  Have fun and make art!


Lovely Ladies

Yes.  A smidge creepy.  And perfect.

These came from Kathy at the M&M.  I had to have all three.  Dealer charge.  Thank you very much.

These are French and German "vanity" dolls.  Sometimes they are attached to a big wire frame "skirt."
I LOVE this ones flaming pink hair!  So unusual.

It's hard to see in these photos, but their eyes are so bright and so are their little red lips!
I adore how they all have a different pose.  Want. More. Now.

Not the best photo but this lovely lady hangs in my studio.  She is a French Boudoir fashion doll.  Her head is made of the same plastery/chalk/porcelain the others are but the rest of her body is blocks of wood linked together with metal loops.  Her hands and one foot (missing one) are carved wood.  Her costume is amazing old silk and net tulle with jewels and metallic trim.  Her eye makeup is so dramatic and daring!  Love. Love. Love.


These two bald beauties are my studio mascots, of sorts.  I found these in an amazing old antique store near Twin Falls, Idaho, out in the middle of East Ankle Scratch, and they called to me.  What's different about these is it doesn't look like any hair was ever attached.  Also, their bodies are all cloth and even have some embroidery on them, that I didn't do.  I think the bodies were made and added much later.  And, the pink bodied ones legs are attached on backwards so her feet face to the back.  Love that.  Yes, I dress these dolls.  Weird.  I know.  But I love little doll stuff so when I found the silver sequin and velvet collar, the silk pale blue cape, brooch from New Orleans, and depression era green dress, they had to be out, on display.  A girls gotta love a doll. 
I love me a doll.
I do, I do.

Garden Shed, I love you!

My garden shed.  You know, where the clippers, mower gas, and Spanish moss are stored!

Shed, I adore you.  You please me.  When you were brown, you were sad.  Now you're blue.  With some green.  And you are fun to look at from the kitchen window, all winter long.  You make me happy, garden shed!

You are adorned with my old broom-flying-witch-weather-vane piece that blew off the chicken coop and broke in a wind storm.  You have a vintage mermaid float attached to your eve, the twin of the one I gave Kirsten, after we found them 13 years ago in a thrift store.  Your good luck horseshoe came all the way from England when my best friend in fourth grade visited her grandma and brought it back for me.  Your galvanized bbq table turned potting bench delights me.  You are the best blue garden shed. 

I love the bird house next to you.

I love you blue bench, by blue bird house, by blue shed. 


I especially love you.  Old green rockerless, rocking chair.  A gift from my mama, 16 years ago.  When I was newly pregnant for the first time, young and secretly terrified.  Before your rockers were broken, you held me, rocked me, while I held him, rocked him.  My boy.  Now 15.  No longer rockable.  And you remind me.  That he is still my baby.  Still my little boy.  And I love you green chair.  You held me.

Another Monster Sweatshirt


Here are the wool felt monsters i made for Jasper and Rowan, just like Iorek's.


This one is/will be Jasper's

This one is Rowan's

Just like Iorek's, Rowan's Birthday Sweatshirt has his birth year too, 03

Rowan likes his Monster Sweatshirt but I have not been able to catch up with him to get a photo of it on him.  Once I find a plain sweatshirt for Jasper, I will finish his and then I will try to get a photo of all three boys in their sweatshirts, together.  Seeing all three, almost finished, made a few of us in our craft group want to make some for ourselves.  Not monsters though....... What should we have?  Whatever it is, I doubt we will be adding our birth years to ours!  Maybe we will come up with a name for this craft group and then we can have it opposite our emblem!  Ha! 
The most likely name for our craft group right now would fall along the lines of : Crafty Wine Swillin' Mamas, or, Mamas Craft and Stitch and Bitch, or, Eat, Drink, & Craft Mamas!

Sew, Stitch, and Mend.  Make, Create, and Imagine.  Smile and Dance.  Do what you Love!


Around my Studio

above my sewing table


boxes and tins of treasure, trinkets and whatnots


a wee bit of all the rick rack, bias tape and seam binding in my collection


another corner of craft love


studio display


more in studio display


I love that I get to "work" in this space.  It makes me happy and I am a lucky girl.  Many of the items you see are an ever evolving and rotating mishmash of pieces that live here for a while and then eventually find their way to the antique mall.  Maybe I will start posting picks of the items I am taking there to sell so you can see what is moving thru.  By the end of summer I hope to have an Etsy link and sell "smalls" there, along with some of my hand/homemade goods.  Stay tuned!

Be kind, try not to yell, and when you do, go gentle on yourself.  Dance.  Sing.  Listen to B. Marley and P. Tosh.  Relax and have fun!

Jasper Parkour Ninja


Check out my Parkour Ninja!  For Jasper's 7th birthday our good friend Brooke gifted him an afternoon lesson with a real parkour Ninja.  Ha!  He had SO MUCH FUN!  And just so you know, he was very careful, rolled in sand, and didn't get hurt :)

Busy Bees Use Flower Petals for Nest Wallpaper

This nest holds a single egg!


I found this amazing story over at NPR !

Its all about a rare solitary bee that makes nests by plastering together flower petals!  Can you imagine?!


An egg laid on top of nutrients.

This is an amazing story by Kathleen Masterson .  And an amazing discovery, by two seperate teams, on the same day, in Turkey and Iran!  Make sure to check this out!


Multiple nests of the O. avoseta bee nestled in the ground.

So super amazing!  Wow, life is thrilling!


Iorek's Birthday Sweatshirt

Iorek's almost finished Birthday Sweatshirt!

Iorek got a black zip up hoody too for his birthday back in April.  His mom, Dianah, just got one for hers too!  Unlike Di's, Ioreks is all hand sewn.  There were so many little tiny pieces that I figured hand sewing would be easiest and it was.  It went super fast once I had all the details cut out.

Work in progress.

I started with a letterpress card that Jasper got for his birthday.  It inspired me to see if I could somewhat duplicate the design idea onto fabric.  This is what I came up with and I am pleased. 

Face details all hand sewn on.

You can see above that I toyed with many ideas about how to do the little details.  I ended up going with non black horns to get more contrast.  Again here, I used wool felt.  Always have, always will.  When it gets washed in hot soapy water it will just all the more bind together and be well held and bound.

Face hand sewn to "mane."

I cut out the mane after I had the face sewn on.  For some reason this made it easier for me.  I guess I forgot to keep taking pictures of the end of the process but you can see by the finished photos of Iorek in his sweatshirt what it turned out like.

Mane hand sewn to horns.

I debated about adding feet.  Something similar to the hands/claws.  In the end I didn't do feet/claws and I like it.  Kinda like he's a monster in his jammies!


"I can make you smile!"

The only thing about hand sewing is that you just gotta be ready to switch colors a lot.  I wanted to match most of my thread to the felt color but you could do a contrast thread color and use it on all of the felt.  If you just get a bunch of needles threaded to begin with then it doesn't seem so daunting to stop and thread a new color each time you need it.

Ready to run the Top Pot Donuts Kids 1K!

The 03 has two functions.  It mimics the sporty gear we see all over the place now so it makes it a bit trendy, if I do dare say so myself.  And, it is Iorek and Jasper and our friend Rowan's birth year.  I am working on Jasper and Rowan's sweatshirts now.  They will be "monsters" too, similar, but different, and all with the 03 on the other side.  They plan to be a little gang of seven year old monsters!  They already are that gang, little monsters, but now they have uniforms!


Jasper and Iorek cracking up.

I adore these two kiddos.  This is how they are when they are together.  Laughing, giggling, smiling, bossing, singing, making music, doing magic shows, investigating, exploring, reading, explaining, spazzing, tumbling, negotiating, bickering, loving and still laughing.  We adore you Iorek!  Thanks for being Jasper's good, good, buddy!  You are an official 7 year old monster gang member!  Congratulations!

Do you Google Reader?

This is just a quick post to make sure you all know about Google Reader.  I kinda assume everyone does but maybe you don't.  I didn't.  For a long time.  And I wish I would have known about Google Reader.  I can't bare to think what I missed!

If you read websites regularly or, especially, if you love to browse blogs, like I do, you will want to investigate Google Reader!  I have listed every blog I love to look at in Google Reader and every day I check Google Reader and only the blogs that have posted something new will be there for me to read!  Do you get it?!  It's like getting a new magazine, every day, with only new content, no repeats! 

I think this is crazy genius!  Silly ol' technologically inept me.  Yep, I think its the bees knees and I want to tell you so!

I even have my own blog listed in there because I love to see it pop up with all the other "totally famous" blogs that I love to read and am inspired by.  Also, since these are my fav blogs, there is often content I want to share with my besties, and there are several easy ways to do that directly from each individual post. 

Do you use Google Reader?  I want to know more.  How do you use it?  What do you do with it?  I will bet you a million bucks right now that it does way more cool stuff then I even know about it.  This would be a good bet for any y'all out there to take!  I'm tellin' ya!  I wonder what else it does that would make my head spin?

Anyhow, get Google Reader if you don't already have it.  Add my blog in there too and then you don't have to come here to check on me all the time!  I'll pop right up with your favorite blogs and only when I have published a new post.  Lucky you!

Live, Laugh, Love...Make, Do, Mend.... !

Rib Cage Love


Dianah's rib cage sweatshirt

Way back in January, I guess it was, according to Dianah, she herself told me about this great sweatshirt she had seen in a local shop here in Seattle.  She wanted it SO BAD but couldn't afford the over $100 price tag.  Of course we LOVE to support our local hand-makers but there just wasn't room in her budget for a new $100 plus sweatshirt. 

enlarged stencil found on Internet

So she is telling me about it, on and on, I love it, I love it, I love it, and I am just thinking, the whole time, I will just make you one for your birthday.  How hard could it be?  I did finally, a few months later, make my way to see THE actual sweatshirt and low and behold, I KNEW I could duplicate it, make something very similar, but with my little touches and have it be close enough that it would still be the sweatshirt Di had been coveting.  Also, it wouldn't cost me nearly $100 to make!

stencil cut out and layed out

So as Dianah's birthday was approaching I was making my way toward the final design and implementation of said design onto a great, almost new, but totally second hand, thrifted black zip-up hoody sweatshirt.  The sweatshirt was the only one little tricky piece to this operation.  I knew if I looked long and hard enough I could find a great one used and not have to buy a brand new one.  It was just a matter of staying on the hunt!  The sweatshirt was located at one of the many fantastic thrift stores in Tucson, Arizona!  When we were there in April I still hadn't found the ideal zip hoody but since I was thrifting my toosh off every day I finally scored the perfect one!

some wool felt pieces cut out and layed out

  In the photos you will see some the steps it took me to get to the final stage: Di loving it and wearing it every. single. day.  Once I had it finished and could see for myself how well it turned out, I just could not wait to give it to her.  It was killing me to not talk about it to her and just give it to her as soon as I was done.  When she did finally open her gift I was jumping up and down like a child and clapping my hands!  What a goof ball!  But it was perfect because we were having a fire in our "tiny" backyard pit and she was cold and needed a hoody to be warm so I tore into the house, grabbed the gift bag, and shoved it in her hands.  "Open, open, open," I demanded!  She was thrilled!  Smiles all around!

pinning in progress

So besides locating the sweatshirt, I had a few other items to attend to.  I had to find a stencil to suit me.  Also, I knew I was adding the little hear under the ribs because that was big part of what Di liked about the original hoody, but thankfully I know how to make hearts so that was an easy step!  The search online for rib cage stencils didn't take long and I was able to enlarge it on my printer/scanner to get the size I wanted.  I only needed to cut out one side of the cage to make the entire thing because each side was the exact same.  Go figure!  The sternum part was a big guessing game because I could not remember if the "original" had one but after much debate between Chad and I, we both decided it looked cool, splitting the one in the stencil, down the middle, and having the zipper go up through the middle of it. 

 
close up of pinning. 

I didn't have any white wool felt on hand so I got that at Ben Franklin.  I got the red there too but a few months back when I was working on Iorek's birthday sweatshirt.  Iorek is Dianah's son and Jasper's real good friend.  I will do a post of his sweatshirt soon!  Anyhow, besides the felt I just needed a million tons of pins!  Some of you know that when I sew, I usually don't use pins at all, or very little.  But for a project like this, you will lose your mind if you try to go pinless!  I knew for best results I would need to pin the heck out of it, get lots of pokes, and I would end up with the perfect finished product! 


the entire thing PINNED!

So then it was time to sew!  I just picked a place and started!  What else can you do?!  I just made sure my sewing machine was loaded with good white thread and began.  As I got one rib done, I would take the pins out and cut the loose threads so I could begin to see what it would look like.  I got into a rhythm and just blissed out on it.  Zen sewing, if you will.  It is thrilling to have a project come together so easily and be able to see your progress so quickly.  It empowers you.  I felt like Super Sewer Girl Super Hero with no seam ripping being my Super Power!

almost finished!  label applied.  heart hand sewing left to do.

I did finish with inserting one of my own home made labels.  And I knew I was going to finish the heart by hand sewing the edges, in between the ribs.  Once that was all done, it was ready to go.  I was so excited by how it turned out!  Very pleased!


close up of hand stitching on heart.

You can see the machine stitching on the ribs in the picture above.  Some places I got too close to the edge and didn't want to chance it not being well attached so I just went back over those spots and restitched inside, more on the rib.  I did not seam rip the original stitching, in those cases, I just left them double stitched and I really like how it gives it more character and makes it look really handmade. 
And oh,  I always use wool felt too, never acrylic.  Not only is the wool natural fiber and much preferred, it will also begin to bind to the sweatshirt each time it is washed.  Oh the wonder of wool!


Dianah in her sweatshirt!!!

Make a gift, give it with love, and be happy!

Create, Upcycle, Reuse, and Make!


Succulent Chair

Yes, Folks!  This is a sedum chair!  And No, you can't sit on it!


I thought I would just keep sharing the things I upcycle or repurpose or deconstruct or reconstruct so you can see what kind of silly ideas I have!

Chair with mesh screen applied.

 Some of you know that I have a space at M & M Antiques in Monroe, Washington.  I rent a space to sell all crazy stuff I collect and I don't have to be there to sell it.  Oh, the beauty of it!  Anyways, those of you who do know me, know that I am a total collector, borderline hoarder, and that when you come to my house you rarely see the same thing twice.  Well, not really, but I do like to live with things for a while, see how they feel, and then recycle them thru my space at M & M when I am ready for them to find their next homes!  You all probably know that this is kinda my business.  I buy items at estate, rummage, yard, garage, tag sales and auctions, flea markets, thrift stores, and other antique stores and then I resell them.  Often, I buy things I love and want, and then when I feel I can let go of them, I sell them at the mall.  And often, I deconstruct, reconstruct or upcycle something, like this half broken chair, into something new and fabulous and then sell it.  I certainly don't make a ton of money doing this but I get to be creative and it also earns me just enough dough to spend the next month, to buy more cool junk!

Close up of seat with wire.  Just used a staple gun to adhere mesh to bottom of chair.

 I found this chair at "my" antique mall.  Melanie and Mildred are really the owners but I will say "my" here and in future posts because I am often talking about several places at once and this is just easier.  So, at my mall, the other day, here was this seatless chair, sitting outside the door, for sale, for beans.  Beans, I tell ya.  And before I even knew how cheap it was, I knew what I was doing with it.  Onward Ho with the sedum/succulent obsession!  One of the uber spectacular or seriously dangerous, depending on how you look at it, things about being a vendor at M & M is that they let us "dealer charge" anything we want.  What this means is that when I want something in the store, I just say "Dealer Charge" and the money comes out of my next months check.  See.  Uber spectacular and seriously dangerous!  I have to be careful to make sure I actually do get a check at the end of each month!  But the great thing is that you don't have to have cash up front to take what you want.  So far it has served me well, to be able to dealer charge, and I have been able to bring home some fabulous finds that I would not have been able to otherwise.

I used Gutter Guard!  I got a few rolls of this at a tag sale for about $1.  I got all they had since I envisioned it as the perfect material for this type of project.  I cut it with old dull scissors and didn't have to use wire snips.  It's not nearly as "pokey" as chicken wire.

The next garden patio project I am working on is the succulent table.  I can't wait to show you the finished product!  I found a perfect metal frame a the end of last summer and knew it was the perfect thing for this specific project I had in mind.  It has some wicker around the edges of it.... kinda hard to explain but I will have plenty of pictures for that post! 


Here is the chair, AFTER Spanish moss was layed down, when the soil was added to prepare for the sedums.  This is a fine layer of moss with a fine layer of soil added on top.  It doesn't take much and since you can fertilize it with your organic fish fertilizer throughout the season, you can get away with a small amount of soil.


After I had the chair prepped to this point, I just started going around to all the various patches of sedums and succulents in my gardens and teasing out bits and pieces here and there.  I gathered several kinds, types and colors and brought them to the chair and began laying them out.  Remember, sedums have pretty shallow root systems so I just do the "laying on" method where you just kind tuck the sedums in where you want them to be.  I arranged the seat for variation in color and texture and then gave it a little sprinkle of soil around and in between them to fill in little spaces.  Then I finished with a good watering of organic liquid fish fertilizer water and Voila!  A gorgeous little planter if I do say so myself!


Hope you readers are thinking about what you have to plant with sedums!  The possibilities are endless! 

Plant what you love, dig in the earth, imagine beauty in the disgarded and ordinary!

Westport


This is what I woke up to in our hotel room on Mother's Day.  Just LOVE it!


Best little surf shop in Westport!


Feet at the beach!


Me: getting up


Me: trying to stay up


Me: happy and pooped

Jasper: learning to respect the power


Jasper, instant pro

August on one of many waves caught


Family photo at the beach after Gus' 15th Birthday dinner.


Loving the Ocean

Celebrate, be with the ones you love, and love the ones your with!


Evelyn Evelyn!


OK, so Blogger is not being nice to me again and keeps trying to publish this post, half done, and it wont let me align left!  Bugger!

No matter!  Evelyn Evelyn!  August and I are going to see this performance on Wednesday night at the Showbox Market.  If you aren't busy, you should check it out!  Not sure if tickets are still available though, and it wouldn't surprise me if its sold out. 
 Do you love weird, wacky, cabaret, vaudeville, burlesque, theatrical, craziness like I do?  Yes?  Then this is right up your alley! 
Amanda Palmer and Jason Webley are the duo behind Evelyn EvelynAmanda was/is part of the Dresden Dolls and Jason Webley is also a well known accordion player who Chad and I saw in Portland last summer when he opened for Neko Case or The Avett Brothers, can't remember which. 
Anyhow, Amanda is married to Neil Gaiman.  Yes, THE Neil Gaiman.  And as Kirsten so aptly put it, "you're supposed to be impressed right here!"  
Look up all three of these cats and see if you might want to check them out the next time they roll thru town or out there on the inter web.  Fun, Fun, Fun!


Check this out on YouTube and prepare to be smitten: www.youtube.com/watch?v=Om5LtHKMrio

See what thrills you, have fun, and be happy!


Sedums and Succulents w/ Tutorial, Part 2

(My apologizes if you found/got only half, or actually, less than half, of the last post, Part 1, originally.  The system I use to publish these posts is called Blogger and for some reason it has taken on a self-publishing mind of its own.  After I worked on and edited various posts for three hours the other night, Blogger decided to publish half of the original Sedum and Succulent post and make the entire second half disappear into the interweb abyss.  Thus, I have had to rewrite all of what was originally the end of the first draft and dole it out in two parts.  Also, I cleaned up the end of the, now, part one, so that it has closure and doesn't just drop off into la la land.  Thanks Blogger!)

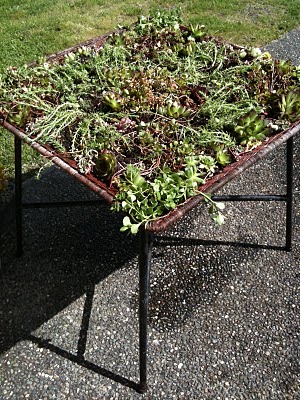
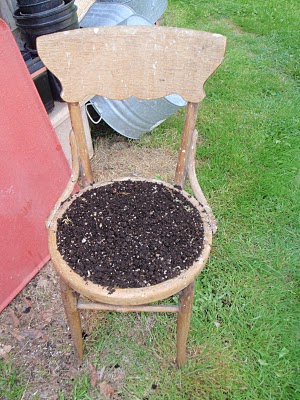
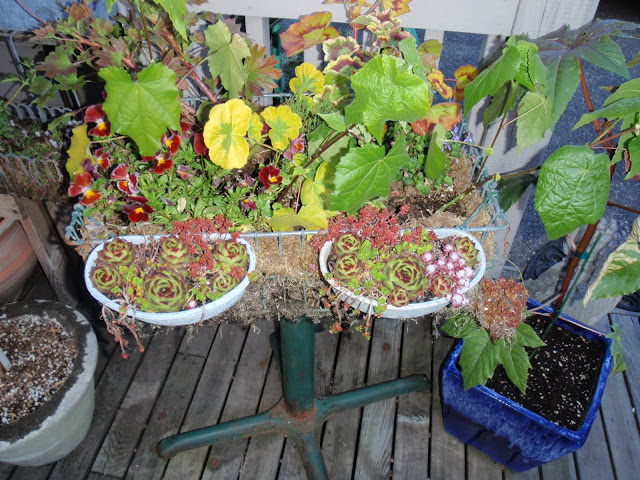
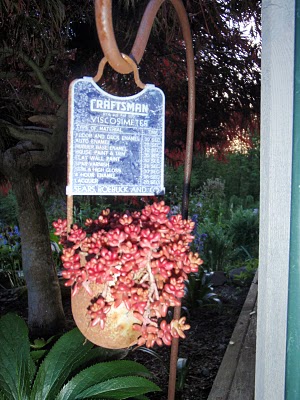
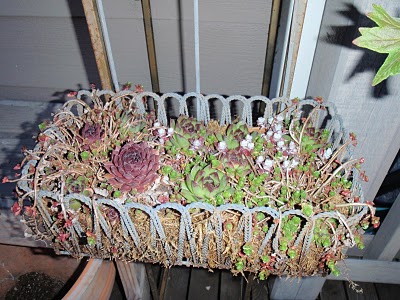
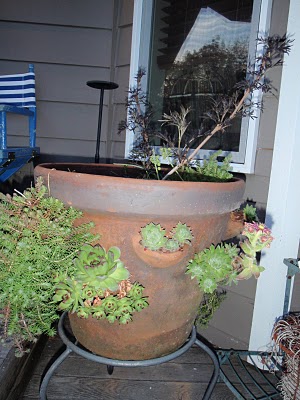
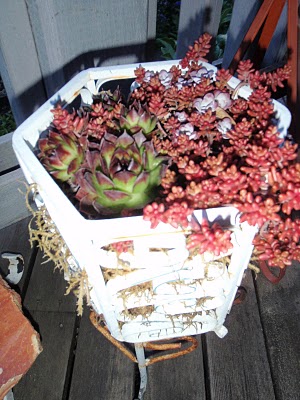
So this is the magnificent baseball pitchers ball holder!  Isn't it glorious?  For me, this has the perfect color green and just the right patina.  I need to get some rust stopping stuff to rub or spray on it so it will stay just like it is.  The moment I saw this at a yard sale, for $5, my heart did a little flip flop because I knew exactly what I would use it for.  It has been such a great planter for a variety of plants, including sedums and succulents, over the last few years.  But now that I look at it I can also envision it being used in a big bathroom to hold towels or in an art studio to hold supplies.  For now it will stay a planter though!  It has this big wire basket top on it and I knew I could use my amassed assortment of Spanish Moss to do the trick of holding in the soil and thus turning it from ball holder to cheery planter box!

Spanish Moss has the wonderful capability of being absorbent, holding moisture, and acting as a barrier so your soil wont fall out of pretty, lacy, wirey containers.  I have used it so many times and below I will show you a super easy method using it to make a planter for your own sedums, succulents or other plants.  Its so simple it's a little ridiculous to presume anyone would need to be told how but since I was making some I figured I'd document it and offer it up! 

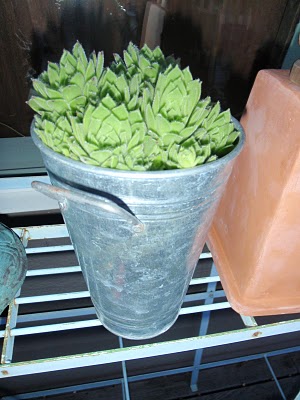
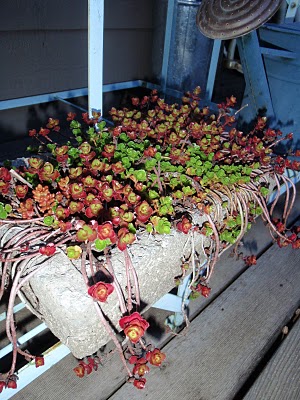
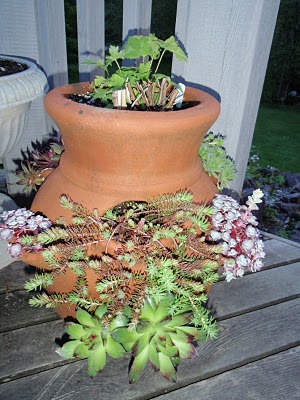
Here is another view of my favorite deck planter and then I will show you the little galvanized "chicken food" containers hanging off of it.


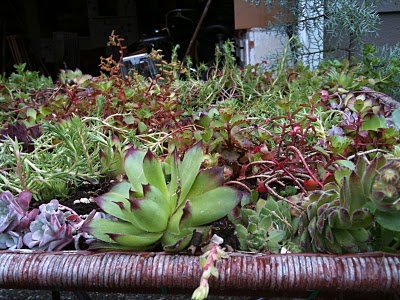
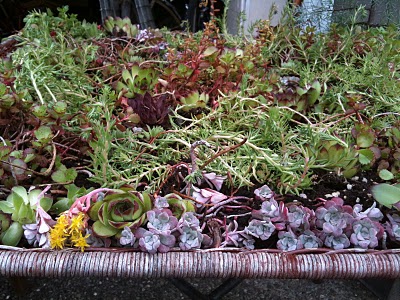
The baseball planter has a variety of plants in it, ever evolving, and some sedums too.  When I am ready to do a major replanting in there, like more than a couple plants, I just take some handfuls of Spanish moss and start packing it around the sides so I can add some more compost and soil and it wont all run out thru the metal basket.  Pretty cool and its holding up well. 
Last summer I found these galvanized chicken food containers and they have a few little clips on the back that you just bend over the edge of the basket to hold them on.  When I saw these for 25 cents each, I snagged them since I knew they would be good sedum planters.  Just like all the other galvanized containers I buy, I got them home and started poking drainage holes in the bottom and then filling them up with clumps of sedums dug out of my yard.  The baseball planter was the perfect hanging spot for them!
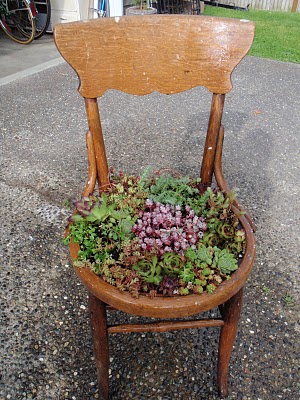
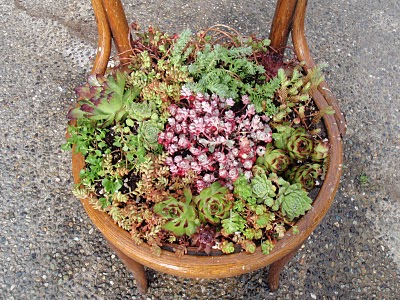
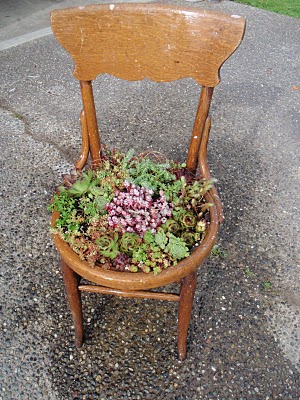
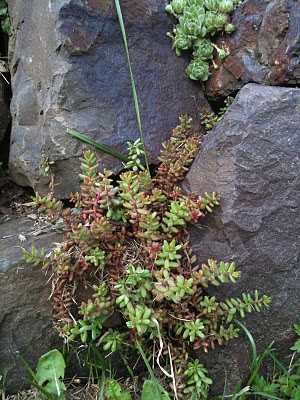
Another great thing about sedums and succulents is that they tend to have shallow root systems so you can kind of lay them on soil, no need to dig big holes, and just kinda pack soil around them and then keep them very moist for a few weeks.  And having shallow roots, it seems that every little piece you pull off will have a least one little root attached to it so you can mix and match and plant different bits here and there to get  a nice blend.  Shallow roots lend themselves to shallow planters so you can find all kinds of interesting shallow containers to use for planting sedums and they make great gifts!

Below I will give you a peek of my favorite galvanized planter on the front deck.  I probably just should have thrown this in the last post, Part 1, but  wanted to give it its due!

TA DA!
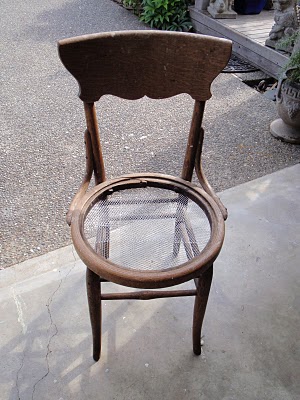
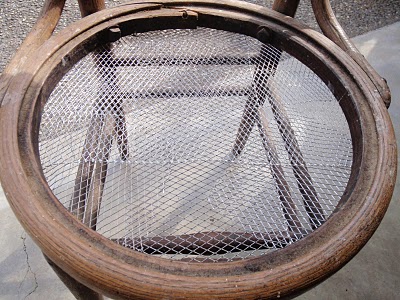
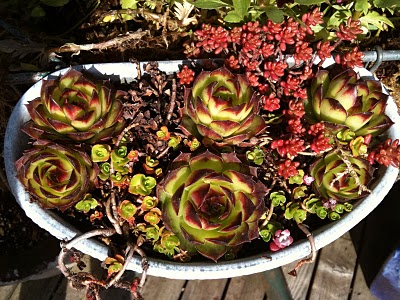
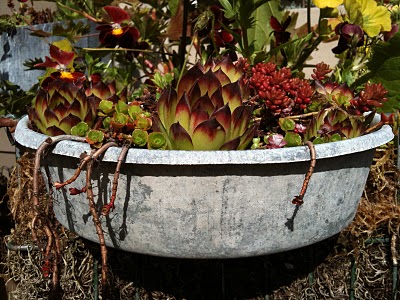
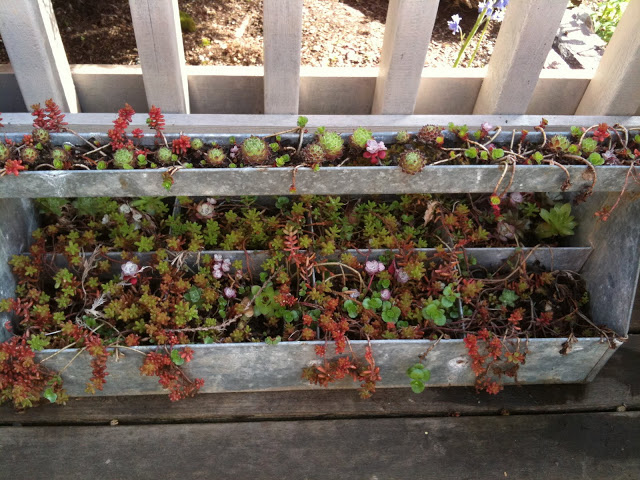
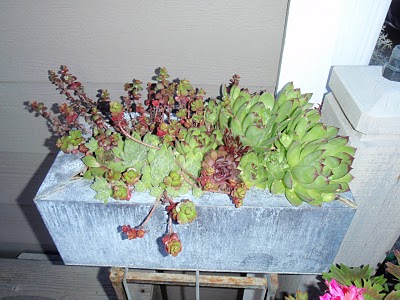
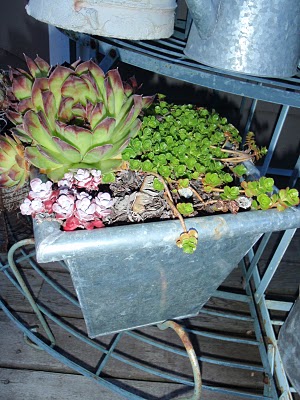
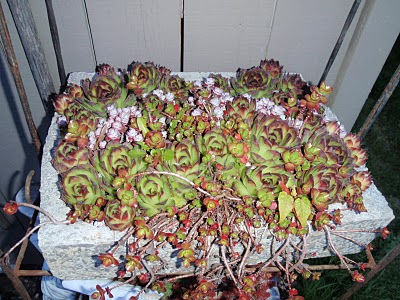
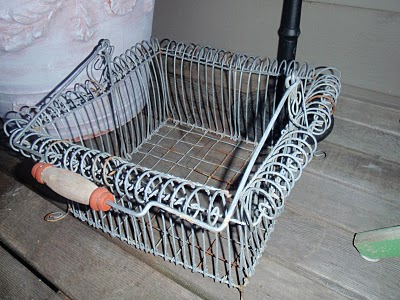
This beauty is a galvanized tool caddy!  Or was.  I love it!  Now it's my favorite galvanized piece, and we all know, now, how much I love galvy!
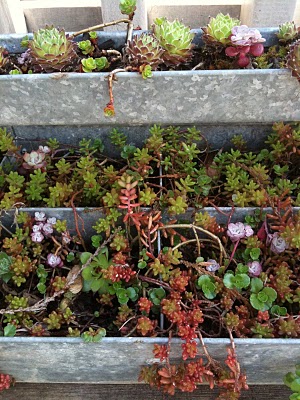
See how the "handle bar" is a long narrow trough?  So cool.  And it lends itself to being planted with sedums, especially, since like I said before, you can just lay your little tiny pieces of sedum in there, mix and match and blend and end up with an array of color and texture. 
The bottom was divided into 8 compartments so I tried to put a piece of each of the sedums I was using in each of the spaces.  You wouldn't believe how sparse and not full this planter looked when I made it.  I thought it would never fill in but by the end of last summer it was full and robust, brimming with color and blooms. 
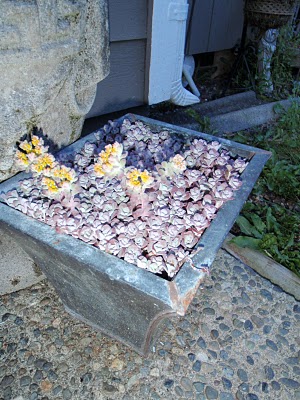
Here is a close up.

Originally I thought I would make this and sell it at the antique mall but I have gone and gotten all precious about it and now I am finding it hard to let go of.  I guess I'm not ready yet.  Maybe by the end of this summer I will be able to let it go to a new home. 

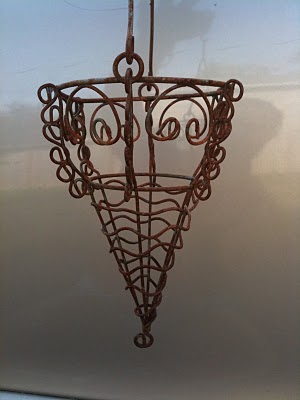
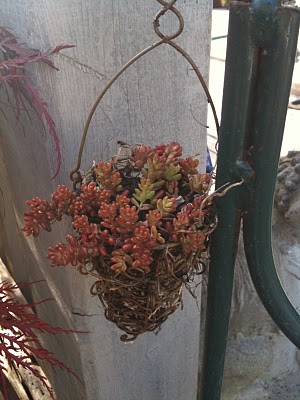
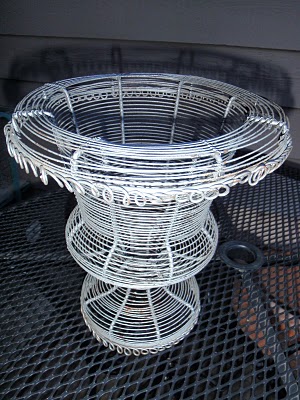
Up next I have a quick little photo tutorial for you on how you can use Spanish moss to make sweet and pretty planters. First I will show you the very small, cone shaped, hanging wire baskets I was planting.  I have two of them so they will look nice hanging one on each side of somewhere:
This is fairly small, like handful size.  You might be able to get a better glimpse of the top hooky thingy in the following photos.

Here are the supplies you need to have gathered:

  1. as many open weave, wire type planters as you want to fill

  2. a combo of soil and compost.  I also always water mine in with organic liquid fish fertilizer since that's what I have on hand and use on all my potted plants so you may want to have some fertilizer handy too.

  3. as much Spanish moss as you can get your hands on, or at least a bag full for a couple small planters.  For some reason I am always finding moss at tag sales so I have quite the assortment and just keep using up what I have.  I am sure you can get it at hardware or home improvement/garden centers though.  (There may be some controversy as to the harvesting of said Spanish Moss so it makes me feel better, somehow, to buy it second hand.  Go figure!)
4.   sedums and succulents!  Like I said, I just go dig mine from many various places around my yard and gardens but you can get them at stores or you could beg, barrow, or steal some from a friend, neighbor or foe!  Take your pick!

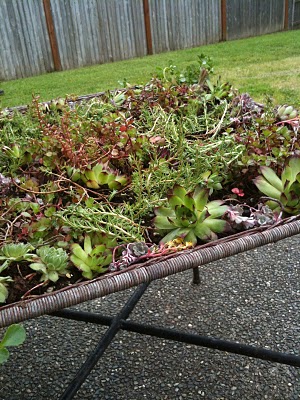
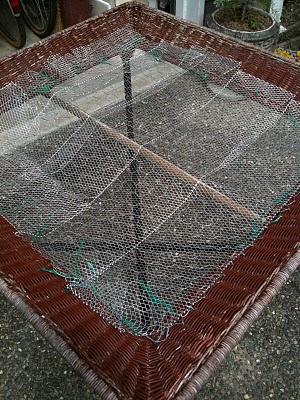
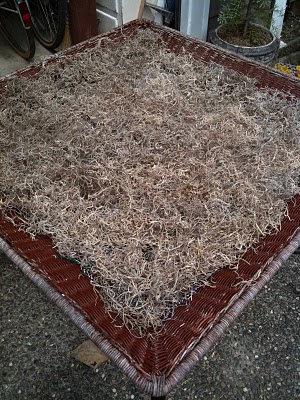
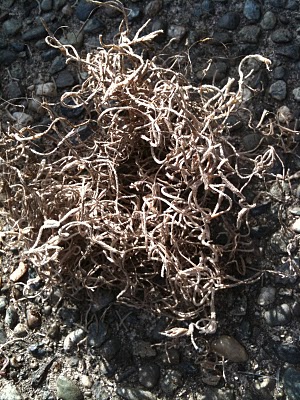
This is a bag of Spanish moss.  Depending on what size planter you have, you may need one to several handfuls.  Also, depending on the spacing of the wire or weave on your container, you may need more or less.  I use as little as I can get away with and that has always been enough.  You may get a little soil leakage at first but that's to be expected.  As long as ALL your soil isn't pouring out when you water your planter, your fine.  So start with a handful and go from there.

Here is some Spanish moss out of the bag.  For my small planters, I used less than a handful.  When you open the bag and try to rip a handful out, you may find that it is all bound together.  You can rip or pull it apart or even cut it with your sheers. 


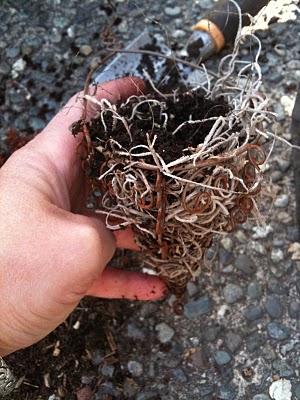
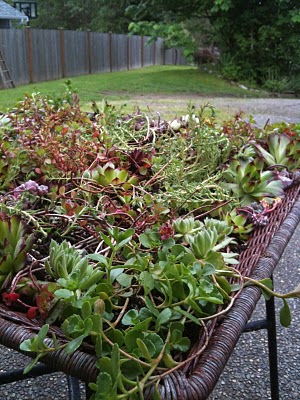
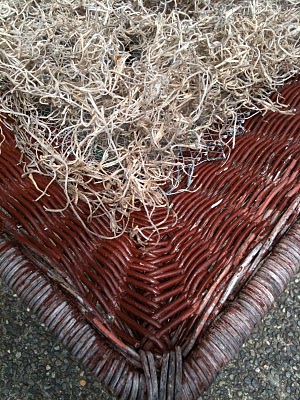
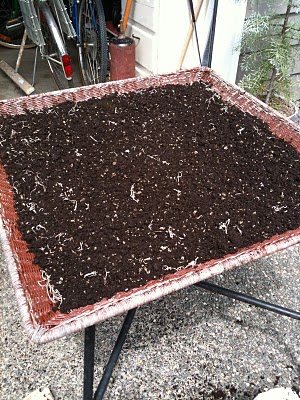
Here you can see how much moss I used around the inside edges of the basket and then how I filled it with soil.  When you start with the moss, begin lightly packing it around all the sides and bottom of your container.  Like I said before, you don't need a ton of moss.  Go lite at first and then take a look at it.  Are there big gaps anywhere?  Is it super thick in some spots and thin in others?  Tease the moss apart as much as possible so you aren't "wasting" it and even out the moss thickness too.  These little hanging cones didn't take much soil but your next step is to introduce the soil to the moss lined container and see how they get along!  Does your soil pour out somewhere, even before you try to water it?  That would be a problem but totally fixable.  Just push the soil aside or dump/pour it out and pack more moss in the thin spots.  Once you are comfortable with the way the moss lined container is holing the dry soil, you are ready to lay in your sedums.

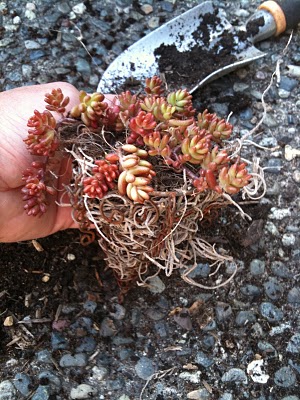
Here is my clump of sedums I plucked out of my garden.  This was enough for both of my small planters so I just teased this clump apart into two equalish sizes and was ready to "plant" the sedum.

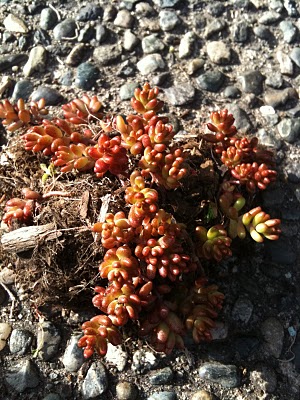
Here is the "laying on of sedum!"  See how a few of the sedum pieces are hanging over the sides and look loose and wily?  Well I just used my finger to tuck those in so they will get a good rooted start.  With some trailing sedums you could leave some falling over the edges but with these type, I tucked them in for good measure.  You are almost finished!  Now you just need to give a nice bold soaking of water.  I don't think you can over-water these little guys so dose them up real good!  I use my fish fertilizer water here so they get a nice jolt of nutrition to get them on their merry growing way.

Voila!

Now you can just look around and find a nice little spot to hang your basket or place you container and watch it grow and fill in.  If you are using more than one kind of sedum or succulent, leave just a little space around them so they have space to multiply.  They will multiply no matter what, and they will push and mass together and look like they have always been there, like a bright mosaic or carpet of color and texture, but its nice to give them a little starting space so they have room to root and bind in.
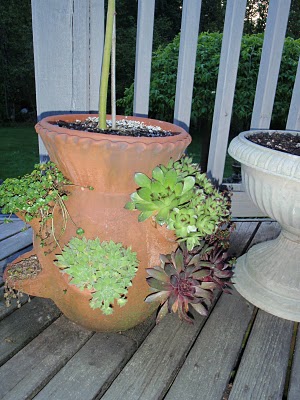
Here is the other one.  Kinda hard to see the cone shape here.  Right now these are hanging off the baseball planter while they root in but they may end up hanging near each side of a walkway in the back, if they don't get given as gifts. 
My next step in blog land is to set up a photos account with one of the main sites so when we make these projects we can post/share pictures of our finished items for all to see!  I will work on that and let you know.....
I hope you have fun making some planters this spring and summer!  Let me know if you do and how it all went!

Do what you do, plant something, be happy, and be bright!


Sedums and Succulents Part 1

This is an old Sears and Roebuck Craftsman Viscosimeter.  It had something to do with paint and enamel originally.  I saw it as the perfect little cup to hold sedums!

I have a fair number of sedums and succulents growing in my garden and in containers around my yard and on my deck.  I cannot identify any of them, except the hens and chicks, but I know they are lovely.  I know that some of them are called stonecrops and some are called wallpeppers but I don't know which is which.  I have no books on them but these two look like they could be helpful. 

Galvanized bucket of hens and chicks.

Sedums and succulents are so versatile and I use them to fill in areas of the rockery, fill in moss-lined wire containers, fill in my Martha Stewart inspired hypertufa containers I made a few summers back, and also to fill in, or stuff in, terra cotta strawberry planters that have never been introduced to a strawberry before!  I even have an old baseball pitchers ball holder that I have turned into a moss lined sedum and plant container! I gotta tell ya, when I saw this thing at a yard sale for $5 my heart nearly thumped outta my chest!  Its gotta be my most favorite planter I own, besides the galvanized metal tool box/caddy one that you will also see in Part 2.


Another galvanized planter.  Its super easy to poke holes in the bottoms of galvanized vessels to turn them into planters with drainage holes.  I have been known to use hammer and nails, drills, and awls!

I have been taking some photos lately of the the many plants in and around my gardens and I have also put together a little photo tutorial on how to use Spanish moss, sedums, and wire containers to create wonderful and unusual garden art planters!  They make great gifts spur of the moment so I always try to keep several "extra" ones around for "just in case."  Also, when you are making one sedum planter, its just as easy to make 3 or 10 since you have all the materials out anyhow.  And its just as easy to water 20 or 50 containers too once you have them planted!  Tutorial in Part 2.
This wire one hangs just below the one above.  This one is meant to hang over the edge of a deck railing but since the one above is heavy enough, it holds it down just the right way, on this odd, random metal frame box type thingy I found at a sale.  This one hangs off, the one above sits atop it.

Here are a few photos of the many types of sedums I have in the garden and rock walls.  When I need some for planters, I just dig out small clumps from all the different types around the gardens.

Another thing I love about the variety of sedums and succulents is that you also get a variety of blooms.  These aren't so much in bloom yet but looking at the variety reminds me that in fact their bloom sets them apart even more.

Here is some more galvanized goodness:


I have an issue with/addiction to galvanized anything.  Can you tell there is a pattern here?  I seem to be pulled right to the dull matte grayish loveliness of it.  It speaks to me.  Here,  I am just showing you the ones that I have planted.  I have umpteen others that are awaiting planting too.

Around here we like to say things like, "can you pass me that Galvy container so I can throw some dirt in it?"  Or, "How about grabbing me that Galvy watering can, please."  And, at tag sales, to my children,  "Quick!  Snag that Galvy piece before someone else does!"  No Galvy goes unnoticed in these parts!  In Part 2 I will show you my favorite galvanized planter, full of sedums!

 There is the galvanized watering can collection too.  Some of the watering cans are planted with pansies (one of my all time favs), and some I use for summer vases, and some, I guess, I could actually use to water plants, but I tend to use my sprayer hose for that.  I digress.  Back to sedums and succulents.

Below are some of the many terra cotta strawberry/sedum planters and hypertufa sedum planters I have strewn about as well:

Here is a hypertufa with trailing sedums.  Another great thing about sedums is they spread around a lot and multiply.  I like that since I have never had to buy any sedums.  I just divy them up and keep moving them to fill in new spots or containers.  The wonder of division!


Here is one of the strawberry planters filled with a variety of sedums in the pockets.  The top is planted with a black elderberry tree that I am trying to  grow bigger before planting out out in the yard and it also has some sedums and snowbells growing in the top too.  It seems every time I plant a smallish size shrub or tree in the yard, Chad cant see them so he whacks em down with the edge trimmer, every. single. time. 
You never know, or at least I don't, which sedums will take off like gang busters and which will take the slow track.  I always try to balance out the colors, texture and size when planting a container like this but sometime it just doesn't matter and the sweet little sedums procure a mind of their own!  Look how the one type above grew out a huge mass on the left and the other pockets look wimpy in comparison?!


Here is another with Delphinium planted in the top.  The delphinium will bloom a few times if you cut it back each time it is done.  This one appears more balanced then the one above and has somehow managed to look almost perfect this spring!


Another hypertufa.  Its been a few summers since I last made these and I have been collecting interesting shaped containers for the next time I make more.  Making these cementish containers is fun to do as a group.  Any of you locals out there want to plan a date to make these at my pad?  Its easy enough to divy up the cost once the materials are bought and the quantities the materials come in are enough for a few of us to make many planters.  Just a thought......


Here is another "pocket planter," meant for strawberries.  This one has a miniature topiary Japanese maple tree growing out of it and I will be planting pansies around the trunk, soon.  Here again is an example of how some sedums are strong men and some are dainty waifs.  The pocket on the left that looks empty is just some tiny little sedum that are slow in coming on this spring but I bet they will catch up and fill in just fine.


So I am going to leave you with a few images of open weave or wire type containers that are best planted with the use and help of Spanish Moss.  In Part 2 I will take you thru a ridiculously easy "how to plant containers with Spanish Moss tutorial."  And in Part 2 I will show you my 2 favorite planters of all time, the baseball holder planter and the galvy tool caddy!  I know, I know, you think I am nuts because you cant picture what the heck I am talking about.  But trust me, if you love container gardening and/or repurposing or upcycling items you find, you will LOVE this as much as me!  Until Part 2, here are a few things to view:


Here are some wire type containers that can be planted with the use of Spanish moss, just like the other hanging wire container way above.  Oh, I guess its kinda obvious but just in case it isn't so clear, the whole point of the Spanish Moss is that you can use it around the inside of the container TO HOLD THE SOIL IN!  Brilliant!  Opens up a whole arena of possibilities for what you can plant in.  I seem to always plant these with sedums but in no way are you limited to said plant. 
Here are some unplanted examples of wire type or open weave planters that will benefit from the use of Spanish Moss:

These look white from the flash but truly they are not painted at all and in fact are grayish darkish metal.

Until part 2, make what you love, love what you make and do what makes you happy!


New Labels and Baby Gifts

An example of my new homemade labels!

Hello and happy Tuesday!  I have several posts I am working on editing and here is a short fast one for ya! 

Last week, I think it was Monday or Tuesday, I stayed in my pajamas all day long.  I wasn't feeling top notch and I figured instead of laying in front of the boob tube and watching Fuel TV all day, I would get to work on my already-should-have-been-done atelier labels for all the fun stuff I have been making.  I am not certain that this is the final design but I like what I am seeing so far.  My new sewing machine, the one the boys got me for my Winter Solstice/Christmas gift, has over 80 built in stitches and 120 stitch functions!  woot woot!  It's not anything too primo or over the top but it works just fine for I do right now AND it has the entire alphabet! 
Anywho, since winter I have been meaning and intending to make these labels so I would have a way of marking my territory, so to speak.  Now when I sell an item I have made or when I gift a handmade item to a friend, its orgins will never be unknown!  My handmade goods will go out into the world with a way to be identified and it also adds a tinge of charm.  Here are some of the other examples:
  These are the three types of vintage fabrics I used this time.  Different fabrics next time!

The plan for my next batch of labels will be to make several that are very long, each word after the next, so I can sew them up the sides of inside seems or along edges.  Sometimes your product doesn't allow for a big "inside" label and I will show you what I mean next.  Also, I will be trying to sew the words onto twill tape and I will let y'all know if I have success with that later.  Here is one example, of an item I have been making, that could use a long narrow label, instead of a big fat chunky one.  Warning to all of my pregnant and expectant momma friends- close your eyes if you want some of your Mother Blessing gifts to be a surprise! 

Reversible bibs in vintage fabrics!
See, a bib would benefit from having a long skinny label sewn up one side.

The other way I have been using my labels is like this:


On vintage fabric baby jackets!


Another


This little jacket should fit up to a three month old, easily, although it looks tiny here.

Close up of label inside baby jacket.

The baby jacket is not my own pattern although now that I have worked with it a bit I am considering drafting my own version.  I am thinking more of a kimono style with ties that wrap around to the front....
This patter is from the book One Yard Wonders by Rebecca Yaker, in the section Outfit your Small Wonder, and the pattern was designed by Anna Buchholz.  The bib pattern is also from this book and although I do not have the designer information for this particular one, it is a very universal pattern and you could find it practically anywhere.  I have made or am in the process of making several items from this book and I would highly recommend it to any sewers out there who: A. are short on time but love to sew, B. who have a buttload of fabric laying around and no idea of what to do with it, C. like to make gifts and are fresh out of ideas!  I have made the kids messenger bag for Jasper and am currently working on the folklore bag for myself using some amazing burnt orange/brownish leather I got from the thrift store and whose past life was as an awesome 1970s Taiwanese trench coat!

Sew your hearts out, label what you make, and do what makes you happy!

Surf Bliss, etc.

Surfing, Westport.

I love you Washington.  I love you Pacific coast.  How blessed I feel to be here, now, able to dive....right....in.

Headed to the beach to surf for the turning of the wheel.  Gus turning 15.  Me being a mom for 15 years.  Alright, already.  Here we go.  Off into the wild blue yonder.

Happy Mothers Day to ALL my amazing mom friends and my own Mama.  I admire, respect and look up to you all, so much.  You are an inspiration.  Thank you.

Do what you love!